
Golden Tiger. White lions: so rare and so beautiful
An exercise known to many people called the “bridge” perfectly trains the flexibility of the spine, muscles of the arms, back and hips. But, before you get such an impressive result from training, you should find out how to stand on the bridge and what to do in order to prepare your body to perform this gymnastic exercise.
How to learn to stand on the bridge?
To begin with, you need to carry out preparatory work. It is required to develop the spine and back and increase the strength of the arm muscles. To do this, regularly for 2-3 weeks perform simple exercises, such as push-ups or pull-ups. This will help train your arms.
Also include stretching exercises in your training plan. You can do the “Swing”; to perform it, lie on your stomach, clasp your ankles with your hands and try to pull your feet towards your head.
If you do the exercises mentioned above for 2-3 weeks, this will help you both quickly get on the bridge and strengthen and stretch your muscles. Just don’t rush, the main thing is not to harm yourself.
How to stand on the bridge from a standing position?
Now let's try to climb onto the bridge from a lying position. To begin with, you should do exactly this, it is much safer than performing the exercise in classic version. Lie down on the mat, take a stance and try to rise using the strength of your arms and legs. For greater safety, ask a trainer or friend to back you up when performing the exercise for the first time. This will help avoid injury.
How to stand on the bridge while standing?
When the lighter version of the exercise is already easy, you should proceed to the second stage. Stand up straight, spread your feet shoulder-width apart, carefully begin to bend your back and try to reach the floor behind you with your hands. If you feel pain in your back, stop the exercise immediately.
How to quickly and safely stand on the bridge while standing?
In order to speed up the process, you should devote more time to push-ups and developing back flexibility. Do not forget to follow the safety rules, use a gymnastics mat, ask for someone to back you up at the beginning of classes, do not perform the exercise if you are experiencing or your arms are not trained enough to support your own weight.
Also note that the bridge should not be done by people who have had a spinal injury or those who experience dizziness. These ailments are contraindications for such training.
Well, who hasn’t dreamed of standing on the bridge and demonstrating their flexibility and flexibility?! Almost everything. What's the problem?! Let's together, with the help of this article, step by step review all the necessary exercises that will prepare our body for this. Don't give up on your dreams! Dream, take care of yourself, your body and you can easily achieve the desired results.
Play sports and!
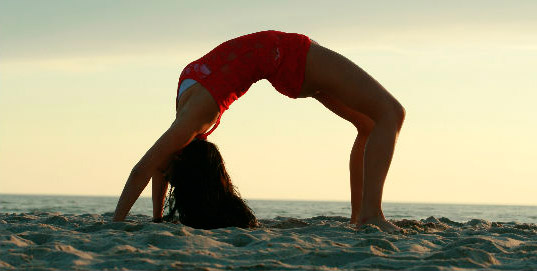
The gymnastic bridge looks very nice from the outside and you will soon be able to show off your flexibility and excellent physical shape.
Before standing on the bridge, you need to stretch the muscles of your back and shoulders, that is, do a warm-up. Later, you will be able to do the bridge quickly and without special preparation, but for this you need to make this exercise familiar and ordinary to you. A must for beginners.
So, in order to quickly and painlessly learn how to perform a bridge, you need to master special exercises, which very well develop back flexibility.
Exercise No. 1. Lie down with your arms stretched up. Raise your arms and legs together, bending as much as possible. Keep your knees straight. It is necessary to fix the position for 30-60 seconds.
Exercise No. 2. Lie on your back, bend your knees and straighten your arms along your body. Raise your pelvis as high as possible, hold for 5 seconds and smoothly lower onto your back.
Exercise No. 3. While kneeling, place your feet hip-width apart. Slowly bending back, reach your heels with your hands. The back should be arched and the head tilted back.
Exercise No. 4. Lie on your stomach, grab your ankles with your hands. Bend over, lifting your head, chest and legs. Hold for a few seconds.
No. 5. Bridge on fitball. Lie on your back on the fitball. Place your feet shoulder-width apart, raise your arms and try to reach the floor.
Exercise No. 6. Lie on your stomach. Place your arms straight at hip level. Arch your back. Now your task is to touch your head with your toes, bending your knees and raising your head. Try holding for 30 seconds.
Exercise No. 7. Bridge from a prone position. Lie on your back. Next, bend your legs and arms, place your hands close to your shoulders, pointing your elbows up. Now try to bridge from this pose by straightening your legs, arms and arching your lower back. When you feel that you cannot bend further, hold the pose at your limit for a couple of seconds. When you get good at this exercise, make it more difficult by moving your hands as close to your legs as possible. Rock back and forth.
Do these exercises every day. If you have them, you will quickly forget about them if you are not lazy, and soon you will be able to easily get on the bridge no matter how old you are.
Gymnastic bridge - beautiful figure V athletics, which demonstrates flexibility and excellent physical shape. Everyone would like to boast of such plasticity, but in practice, few people can learn this on their own. And yet, this is possible even at home - if only you had the desire and perseverance. Recommendations from experienced coaches and gymnasts will come in handy.
So, you want to learn how to stand on the bridge by all means, but you don’t know where to start. Before moving on to the practical part of the classes, familiarize yourself with the general recommendations.
To begin, objectively evaluate your initial data: weight, flexibility, physical fitness. If your body weight exceeds 80 kg, if your back is not flexible and you have never done gymnastics before, you should not expect to get on the bridge in a week. You'll have to work hard not less than a month, or even more.
Check the degree of flexibility of your spine. To do this, attach a mark to the wall at shoulder level.
- Stand with your back to the mark. Take one step away from the wall. Bend your back backwards. Saw the mark - you flexible person and it will not be difficult for you to get on the bridge even in a week with good intensity of training and perseverance.
- Turn to your left side, lift your straightened body up right hand, try to touch the mark. Repeat the task for the other side.
Choose a set of flexibility exercises. Home study patterns may vary depending on physical training and mood:
- daily for 15-20 minutes;
- every other day for 30-40 minutes;
- twice a day for 15 minutes.
We have selected for you two videos with training courses for beginners from professional fitness trainers. By completing their tasks exactly, you will be able to do this quickly.
Flexibility exercises
To quickly learn how to stand on a bridge, you need to perform various exercises daily to develop flexibility. Without them, it will be difficult for your body to accept this position, which, in principle, is unnatural for it.
We immediately warn you that most of the exercises are very difficult and will not work out the first time. But with each workout, the muscles will become more and more firm and elastic.
Warm-up
- Bend forward and backward.
- Mill.
- Turns in different sides.
Shoulder girdle
- Rotations with straight arms: simultaneously / alternately, forward / backward.
- Palms lock. Straightened arms, lowered down. Lift up, bending your back and shoulders.
- Bend your right arm at the elbow at chest level so that your forearm is parallel to the floor. Rotate your upper body to the left, twisting your spine. Repeat on the other side.
- Raise your arm bent at the elbow. Place your forearm behind the back of your head. With your other hand, pull it as far as possible to the side and down. Do the same for the other side.
+ lumbar region
- The most effective exercise for the bridge: bend your back as far back as possible, throwing your head back, but maintaining your balance. Can be done from a standing or lying position.
- Tilts in different directions, forward and backward.
- The upper body is parallel to the floor. Palms lock. Swing your straightened arms so that they are above the back of your head. Repeat several times.
- Holding the back of the chair, bend your spine as far as possible with your legs straight.
Back
- Rotation of the body in different directions.
- Starting position - on all fours. Arch your back up and down at the same time as much as possible, like a cat.
- Lying on your stomach, with your palms clasped at the back of your head, bend your lower back as far as possible.
- Lying on your stomach, with clasped arms extended forward, bend your spine back in an arc. Roll from your hips to your chest and back.
- Place your palms on the floor, lie on the floor on your hips, bend at the lower back. Tilt your head back, touching the back of your head with your toes.
- Standing on your knees, rest your hands on your heels. Bend at the waist.
- In the same position. Perform leg swings, bending at the lower back. Try to see your foot above your head.
As soon as you begin to get the hang of the exercises, you can make your first attempts to stand on the bridge from different positions - lying down, sitting, standing.
From different positions
If you have finally started to succeed in most of the exercises from the complex described above, it’s time to move on to performing our cherished figure. If you are scared, ask someone at home to back you up. The most important thing is to master the techniques.
From a lying position
- Lie on your back, bend your knees so that your heels are near your buttocks.
- Place your palms on the floor so that they are above your shoulders and your fingers point toward your torso.
- Tighten your leg muscles and forcefully lift your pelvis.
- Leaning on your hands, bend your back, try to straighten your legs.
From a sitting position
- Keep your back straight, bend your knees, and place your feet on the floor.
- Put right palm back to the floor, turning your torso slightly.
- Lean firmly on your feet and right arm, lift your buttocks off the floor. Describe an arc with your left hand, place your palm on the floor, try to stand on the bridge.
- To return, you need to repeat all the movements again, but in the reverse order, which is not easier.

From a standing position
- Near the wall bars, bend your back back, grab the bars with your hands and, moving through them, go lower and lower. Return to the starting position in the same way. Shoes and the floor should not be slippery, otherwise you may fall and hit the back of your head.
- It's easier to do this with the help of an outsider. Just ask someone at home to support you with two hands (a ring) around your waist while you do the stand. Then it will be enough for him to hold your back with one hand, and at some point he will remove it too.
- Bend at the waist (without the wall bars and outside help), bend your knees, and lean your body a little forward.
- Straighten your arms and bend back to touch the floor with your palms.
- It is even more difficult to stand up from the bridge: you need to move your body forward and bend your knees. Push off the floor slightly with your hands and straighten up. It is the arms that should go first, not the shoulders - this is typical mistake for all beginners.
INperforming a gymnastic bridge is a beautiful and graceful demonstration of excellent physical fitness and flexibility. And if you don’t succeed in doing this exercise, despite your efforts, then you should not give up. There are special exercises that will allow you to as soon as possible stand on the bridge.
Beginners, before standing on the bridge, need to do a warm-up - stretch the muscles of the shoulders and back. Stand on a gymnastic bridge without preliminary preparation It is possible only when its implementation becomes ordinary and familiar and does not bring any difficulties.
A set of special exercises
Designed to develop flexibility of the back muscle group. All exercises are aimed at ensuring that performing a gymnastic bridge does not bring painful sensations, but is performed as easily and quickly as possible.
Exercise one

Lying on your stomach, arms extended upward. Trying to bend as much as possible, lift your legs and arms at the same time. Keep your knees straight. In each upper position they linger for 30-60 seconds.
Exercise two

Lying on your back, legs bent in knee joints, arms are extended along the body. The pelvis is raised to the maximum possible height, stay in this position for about 5 seconds and smoothly lower back onto your back.
Exercise three

Kneel down so that your legs are hip-width apart. The torso is slowly tilted back, bending at the lower back, and the hands touch the heels. In this case, you need to tilt your head back and arch your back.
Exercise four

Lie on your stomach, holding your ankles with your hands. While bending, they simultaneously raise their legs, chest and head. In the upper position they linger for several seconds.
Exercise five

Performed on a fitball. They lie on it with their backs, put their feet shoulder-width apart, raise their arms, and then try to touch them to the floor.
Exercise six

Performed from a prone position. Straight arms are placed at hip level. First, the back is bent back, and then, bending the legs at the knee joints and throwing back the head, touch the toes to the head. In the final position you need to stay for 30 seconds.
Exercise seven

At the end of the complex, a bridge is performed from a supine position. First, bend your arms and legs. Place your hands as close to your shoulders as possible, and your elbows point up. Then from this position they try to stand on the bridge. The legs and arms are straightened and the lower back is bent.
As soon as you feel that it is no longer possible to bend further, you need to stay in this position for at least two seconds. When the exercise ceases to cause difficulties, it is necessary to complicate it. To do this, the arms are pulled closer to the legs and then swung back and forth.
The given exercises must be performed daily. They will not only allow you to easily stand on the gymnastic bridge, but will also relieve problems with the spine. The complex can be performed by absolutely everyone, regardless of age.
Performing a bridge from a standing position
You can move on to this exercise after you have completely completed and mastered the preparatory complex. It can be performed either against a wall bars or against a regular wall. The main thing is the availability of free space.
Stand with your back to a wall or wall, maintaining a distance of about 80 cm from its surface, with your feet shoulder-width apart. From this position, they begin to lean back until their fingers rest against the wall. To lower yourself, move your fingers along the slats or along the surface of the wall until the moment when your hands are on the floor and a full bridge is made.
The final position is held for several seconds and then returned to the original position. This should be done in the same way as lowering with the help of your fingers, moving them along the wall or slats, but already going up.
When performing a bridge with a wall has been brought to automaticity, you can begin doing the exercise on a gymnastics mat. At first, it is better to perform a bridge on the mat with a partner who will support your back for safety.
To do a bridge on the mat while standing, bend back, stay in the position for a few seconds, and then smoothly lower yourself onto the bridge. IN last position you also need to linger. For acceptance starting position It is enough to push off the mat with your hands.
You should start making a bridge yourself only after you have gained complete confidence in your own abilities.
How to stand on the bridge correctly and gracefully
The effectiveness of the gymnastic bridge is given by correct technique and beautiful performance. There are several common mistakes to avoid:
- There is no need to be afraid of losing your balance when walking onto the bridge using your back and shoulders. When performed correctly, only your hands should be involved.
- Quite often, many people do the exercise without bearing the weight. own body on the arms, that is, through the back, without using the shoulders. As a result, the arms are too arched, and the bridge is unstable and looks unsightly.
The correct bridge is performed with the weight transferred to the hands. The angle between the hands and the floor should be straight. This can be achieved by pre-warming the shoulders. To do this, standing on the bridge, you need to rock back and forth, stretching the shoulder muscles.
How to stand on the bridge - Video