
What to tell 3-year-old children about summer. Pictures for children on the theme “Summer” for activities in kindergarten and at home
In the pre-New Year bustle, sometimes there is no time for the Christmas tree: crowds in stores and at specialized Christmas tree markets discourage anyone from purchasing a fluffy beauty. However, in order to have a real Christmas tree in your home, you don’t have to buy it. From this article you will learn how to make a Christmas tree with your own hands from scrap materials.
We have collected for you more than 20 master classes with step by step photos instructions, so creating a holiday atmosphere in the house will not be difficult, even if there is absolutely no time left. These lessons will also be useful for mothers, because creating miracles with your babies is a pleasure!
By the way, if you already have a real tree (artificial or natural), a DIY Christmas tree will be an excellent themed gift for family and friends! In general, stock up on the New Year's mood and go ahead and create!
Let's start, perhaps, with the very simple option- Christmas tree made of paper. To make it you will need colored paper, scissors, glue, toothpicks and hole punch.
#2 Christmas tree made from wrapping paper
To make such a Christmas tree you will need: cardboard or thick paper, wrapping paper of several colors, scissors, glue or double-sided tape.
#3 Origami Christmas tree
To make a Christmas tree you will need: paper, scissors and patience :)

See more paper Christmas trees:
To create you will need: felt, scissors, needle, thread, glue.

You will need: felt, buttons and beads for decoration, needle, thread, cotton wool, scissors.

Find more felt Christmas trees in the article:
#6 Christmas tree from a plastic bottle
You will need thick paper, a plastic bottle preferably green, scissors, and tape.

#7 Christmas tree made from table napkins
You will need: table napkins, a bead, a sewing machine or a needle and thread.
You will need: a plastic bottle or wine glass, pasta, glue, paint.

Need to more ideas from pasta?
You will need: thick paper, pine cones, glue.

We have more ideas for crafts made from pine cones:
You will need: thick paper, coarse threads, glue, beads.

#11 Wire Christmas tree
You will need: thick paper, wire.

#12 Christmas tree made from dough
You will need: salty dough(cold porcelain or polymer clay), scissors. We form a cone from the modeling mixture, and then “pinch off” the legs using scissors. For greater realism, the legs can be slightly bent upward. Next, we send the Christmas tree to dry. After complete drying, the craft can be further decorated, for example, with paints, sparkles, beads, rhinestones, etc.

You will need: thick paper, colored paper, glue, a lot of patience.

#14 Christmas tree made from cardboard toilet paper cylinders
You will need: roll cylinders toilet paper, crepe paper, scissors, glue, thread.

Are there any bushings left? Make more original New Year's crafts!
#15 Christmas tree made of threads
You will need: paper, thick threads, scissors, glue, beads.

#16 Christmas tree from an old magazine
You will need: a magazine, glue, beads or glitter for decoration.

You will need: cotton wool, a dry twig, threads, ribbons, beads and sparkles for decoration.


#19 Christmas tree made from wine corks
You will need: corks, glue, tapes, paints.

#20 Delicious Christmas tree made from strawberries
You will need: thick paper, strawberries, chocolate.

#21 Christmas tree made of wrapping paper
You will need: wrapping paper, glue, whatman paper, decorations.

#22 Christmas tree made of balls

#23 Christmas tree made from dry branches
You will need: dry branches, rope, lanterns and other decorations.

#24 Christmas tree made of cotton pads
If you want to make a Christmas tree from scrap materials, then it’s time to pay attention to cotton pads. You will need thick paper for the cone, cotton pads, glue and beads for decoration. By the way, you can decorate the Christmas tree with any materials of your choice: sparkles, sequins, watercolors. Or you can just leave it white. As you prefer or as time allows.

Even more crafts at New Year from cotton pads:
#25 Christmas tree made of ribbons
You can make a cute Christmas tree from ribbons. To do this you will need a foam or foam cone, ribbons and a lot of safety pins. The top of such a Christmas tree can be decorated with a gold paper bow.

We are full of ideas for New Year's crafts made from ribbons
#26 Christmas tree made from a napkin: decorating the New Year’s table
You can make a Christmas tree from table cloth napkins. Both the Christmas tree and the decor New Year's table. Try it and you won't be able to stop!

Help us improve: if you notice an error, select a fragment and click Ctrl+Enter.
Preparations for the New Year continue! You and I have already made garlands. Would you like to know how to make a Christmas tree with your own hands from scrap materials? This craft will be useful for decorating your home, and as work for a kindergarten or school.
And this section will consist of 2 topics:
- Desktop options;
- Big sizes.
The first ones are suitable for our children as crafts for school or kindergarten. The second ones are more for decorating the room. For home or office.
Children's crafts for school or kindergarten
For most robots, you need to make a base. And it will be a cardboard cone. Here I will tell you how to prepare it.
Cone
You can simply draw a circle and glue a cone out of it. 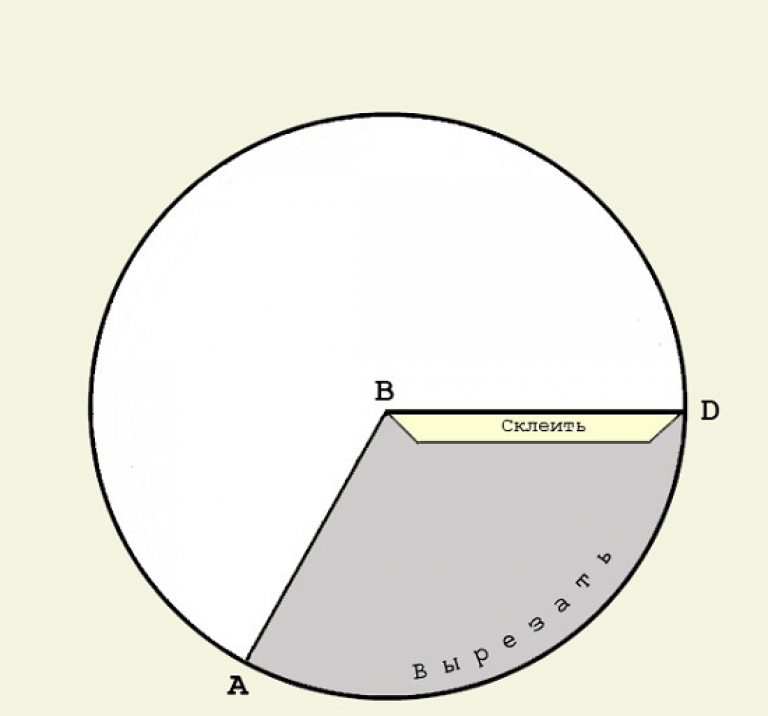 But there is also another variant.
- We measure the width of the sheet.
- We measure this distance from the upper corner of the sheet using a compass, ruler or just a thread. And make dots on the sheet with a pencil.
- Let's connect the dots.
- Cut it out.
- Glue it together.
Third option- Roll up a paper bag. Fold the edges.
Now we use this blank.
Our crafts
I’ll start with the Christmas trees that my son and I made from twine and the second from decorative Christmas tree beads:
Another Christmas tree that I hung on the wall and it made me happy until the summer. Looks very nice as decoration. Made from twine and twigs. And toys made from salt dough.
Like it! We will be pleased.
Tinsel

- Glue tinsel to the bottom row of the base.
- The next row is candy.
- And so on to the top. And instead of a star there are lollipops.
The photo shows candy. But you can decorate with anything instead of candy. True, a Christmas tree with candy canes looks especially elegant. She herself is like a gift.
Threads

You may have seen openwork balls made this way more than once. The Christmas tree turns out to be no less lacy!

Do not wind the yarn too tightly, otherwise the delicacy will be lost. This original craft“knitted” from white threads. But you can use both green and blue.
The second option is to make a base of threads, as in the previous master class.
Crafts for home
I will display 2 models separately. They are definitely not suitable for school. However, the houses will look beautiful.
Traffic jams

Sometimes it's a shame to throw away corks. And there are a lot of ideas for decor from them. So we use this material.
- Let's draw a triangle.
- Following the template, we will make row by row, connecting the corks with glue.
- Some corks can be painted.
- Let's form a bow on top.
- Another plug will serve as the “trunk” of the tree.
If you wish, you can come up with a pattern for the spruce.
Boards

This design looks powerful. But it won’t be possible to do it quickly.
We will also need small boards. They will be at the top of the tree. And the big ones are below.
Between them you will need to nail several small wooden squares, like a tree trunk.
As an option, a Christmas tree made of stairs and a bunch of balls. Really unusual!? I think guests and neighbors will also be surprised. If you are tired of ordinary spruce, then this idea is in your bag: 
You can make a miniature from coffee or ice cream sticks or small boards. 
From cardboard

You can make a Christmas tree of any height. Moreover, cardboard sticks can be twisted and changed the shape of the Christmas tree!
We cut the cardboard into equal strips using a stationery knife and a ruler (be careful with your hands). We put it on the knitting needle. You can spray paint it or leave it like that.
Wall installations
Wrapping

Such work will look like a colorful picture. And it completely matches the festive mood.
- Roll the paper into tubes.
- Glue it onto the base in the shape of a triangle.
- Decorate with buttons.
Simple and interesting!
Branches on the wall

There are many ways to decorate this simple Christmas tree model.
You can use the following as a design:
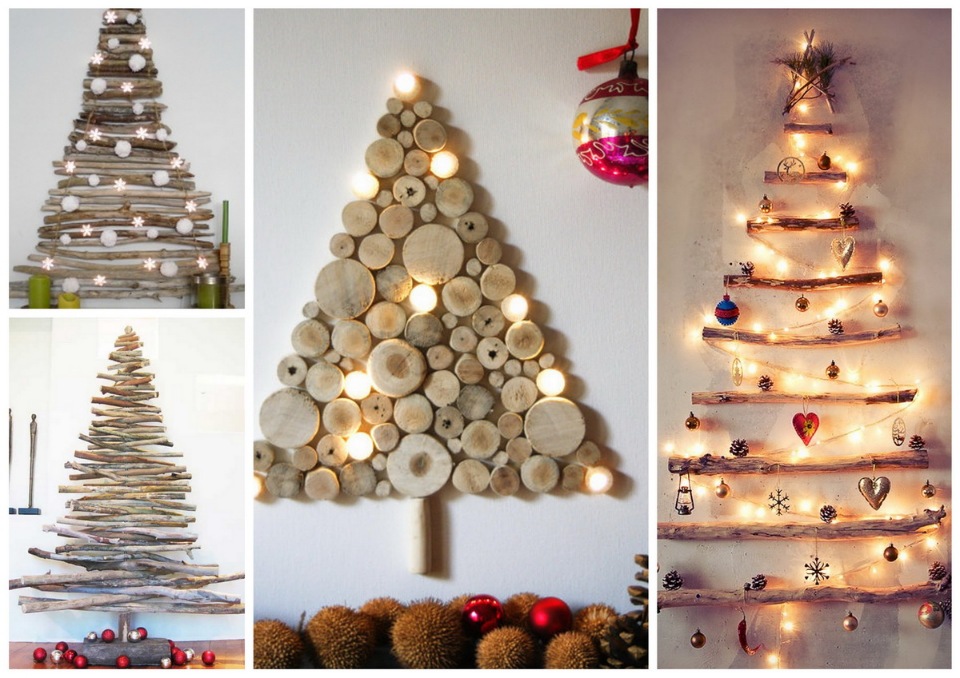
- Toys;
- Fairy lights:
- Children's crafts;
- Houseware.
Or you can tightly connect the branches, without gaps, and paint them in light snowy tones.
Glowing garland

I'll tell you step by step about this model:
- Choose a suitable location.
- Drive 3 nails into the wall (triangle shape).
- Tie the garland to the nails, like the edging of a triangle.
- Tie several branches to a rope.
- Secure the rope itself to the top nail.
- Decorate the interior space by gluing photographs, snowflakes, and toys to the branches.
More options: 
All work is filled with warmth and pleasant emotions.
What material will you choose? I tried to fill the collection with very different ideas and options. If you have anything to add to this collection, please tell us! And don’t forget that we have a continuation of the New Year’s theme ahead. Subscribe to learn how to make your own star!
Greetings, friends! When you start to think about the onset of magic winter holiday New Year, you immediately think about miracles and gifts under the Christmas tree. After all, every family has such a tradition. In addition, the Christmas tree is the main attribute New Year's Eve and its absence is simply impossible to imagine. Therefore, I propose to talk about it today.
Previously, people always cut down the forest beauty and destroyed trees just because of a few. Now everything is a little different. Real Christmas trees have been replaced by artificial and homemade ones. The artificial option is good because once you buy the product, you install it every year. But DIY Christmas trees will be different from all others and will somehow decorate your home in a special way.
In addition, homemade Christmas trees are usually not made big size. And this allows you to solve the problem of installing a forest beauty in an apartment that does not have much space. Also, products can be placed on window sills and create a single composition with New Year's window decor. And if you have very active children who can tear down a tree, then the idea of a homemade product is perfect for you. After all, a small Christmas tree can be easily placed where children cannot reach it.
I would like to bring to your attention a large selection of photo ideas and master classes on making a decorative Christmas tree with your own hands. The products can not only decorate your home, but also serve as a creative gift or decorate any thematic exhibition.
How to make a Christmas tree with your own hands for the New Year? 30 photo ideas
As always, first I want to invite you to look at finished works and understand what and from what our hero of the occasion can be created. And, in fact, see with your own eyes already realized ideas.
I note that you can make a Christmas tree from various available materials. We will consider all options, and in detailed master classes. Therefore, read the post to the end, there will be a lot of interesting things!
Most popular way create trees from thread and PVA glue. Makes great crafts. Moreover, such works are easy to decorate, for example, using beads and paper.

Also do not forget about such material as fabric. You can sew different Christmas trees from satin types. By the way, please note that the fabric blank is fixed to the cone with glue. This idea is present in many crafts. You can use felt and stuff it with cotton wool.

You can also use pasta, and first you can color it in green color. And for a festive touch, alternate rows of pasta with tinsel.

And here is a paper beauty. You can create it from ordinary colored paper, which is cut into strips and glued together in the form of droplets.

Now I propose to do the work from tinsel and delicious sweets in shiny wrapping.

But there is only one fluffy tinsel and real ball toys.

Or it would be great to weave a souvenir from beads. And this is done in an elementary way. All you need are wires and the beads themselves. Here's a look at the finished work.


And here are the weaving patterns closer to you.


Spruce can also be collected from truffle sweets. The basis is also a paper and cardboard cone.

And how cool the crafts look with lighting. Simply magical! In this case, ordinary mesh fabric or floral mesh is used.

Make a beauty like this from a paper cone and buttons. Great idea for crafts in kindergarten or for an exhibition at school.

In addition to fabric, ribbons also work well together in trees. Cheap, creative and festive!

And look at the next picture. I would never have guessed that this souvenir was made of paper. It turns out to be a very voluminous craft.

I completely forgot about the easiest way to make trees. When two blanks are made and inserted into each other. I'll tell you more about this option below.

Here is another step-by-step diagram for creating a Christmas tree from threads. Interested in this idea? Then scroll below and read the master class. And of course, then turn everything into reality.

I really liked the next souvenir. My daughter and I will definitely make such a forest beauty. And let her decorate her room.

Here is another work for children's creativity. Natural material in the form of cones - both simply and tastefully!

If you have accumulated toilet paper rolls, don’t rush to throw them away. After all, you can make a green tree from them.

Or use feathers. They can always be purchased at a hardware store. This product is very quick to make and looks impressive and airy. Ordinary white feathers can be colored using food coloring.

And I also found a job made from pasta. I really liked it. So I'll leave it here too.

Also, don’t forget about the Christmas trees. They are very cute.

You can always sew green trees from felt.

Or make it from foamiran.

And what a blessed material sisal is. Create endlessly!

And a wooden tree. Great idea!

And if you are a very creative person, then make a tree out of books.

As you can see, Christmas trees can be made from anything. In this case, a cone is taken as a basis, which is subsequently pasted over and decorated. different materials. You can also make products from plasticine. But since we are considering options for replacing real wood, we did not take plasticine work into account. Although they are just right for children's creativity.
Christmas tree made of fir cones and pine cones
Now let's move on to the master classes. And first of all, I want to show you how you can make a tree from pine cones. So the smell will remain in the house, and the mood will certainly become festive.
Collect pine or fir cones. Choose open, but at the same time strong and whole fruits.

You will need: cones; hot glue; heat gun; cardboard; scissors; tinsel and toys; flowerpot; spray paint.
Manufacturing process:
1. First, decide on the size of your future spruce. Then cut out the base from the appropriate size cardboard.

2. Clean the cones from dust and sort them by size.
3. Now start laying out the cones in tiers in a circle, using first big shots. Connect the pine cones and tiers together using hot glue.


4. As shown in the photo, assemble the entire product. And at the very top, fix the cone vertically.


5. Decorate your beauty with any decorations. You can also paint the cones with spray paint. To ensure that the tree stands firmly on the floor, glue its base to flower pot using the same hot glue.


I would also like to suggest you make a souvenir from cone scales.

You will need: cones, sharp knife, cardboard, glue, cloves, brush, acrylic paint, glitter.
Manufacturing process:
1. Clean the cones from dirt and dust and separate the scales. Do this carefully with a sharp knife.


2. Roll the cardboard into a cone and glue it on the side. Trim off any excess cardboard at the base.


3. Now glue the scales in a circle, starting from the very base of the cone.

4. When you reach the top, glue a clove on top.

5. Wait for the glue to dry and start painting. Take acrylic paint and paint the scales.

6. Grease the ends of the “twigs” with PVA glue and sprinkle with glitter.


7. You can leave the product as is or further decorate it to your liking.

Now that you know two simple ways to make coniferous trees with my own hands, I can show you ideas for their design. Look and choose!


Most easy way Making a spruce from a cone means decorating one cone, because it looks so much like a forest beauty.


Master class on making a Christmas tree from candies and corrugated paper

You will need: tinsel, corrugated paper, candy, stapler, thick paper, newspaper, glue gun, wire

Manufacturing process:
1. Take a sheet thick paper and roll it into a cone. Glue the seams and secure with a stapler.

2. Level the bottom of the cone so that it stands firmly on the surface.

3. Then trace the bottom on thick paper and add allowances for later gluing. Cut out the bottom.

4. Crumple the newspaper and fill the cone tightly with it. Glue the bottom.

5. Carefully insert the wire into the crown and secure it with a glue gun.


7. Make another one exactly the same as you did before, only from corrugated paper.

8. Glue the corrugated paper bottom onto the regular bottom.

9. Now make strips of corrugated paper 50-60 cm high and 5 cm wide. Wrap (glue) the cone with these strips.


10. Glue on the glue gun lower tier tinsel. Glue candies on top of the row of tinsel.

11. Glue the next tier and the next portion of candies.

Glue the candies in a checkerboard pattern.
12. Continue in the same spirit, alternating a row of candies and a row of tinsel. Moreover, towards the top the number of candies will decrease to two.

13. Cover the end of the wire with tinsel and decorate with a bow.

14. This is the extraordinary beauty that results.

Take note of this method. After all, this is a great gift!
And as a gift, take as a basis not a cardboard cone, but a bottle of champagne.

Now see how you can create a spruce tree only from corrugated paper.

You will need: corrugated paper; cardboard; scissors; thread and needle; heat gun; beads and sequins.

Manufacturing process:
1. Cut a blank from cardboard in the form of a rectangle or square.

2. Roll it into a cone and glue the part together. Level the base.

3. Cut strips of corrugated paper 5 cm wide. And then sew them with thread along the entire length as shown in the picture below.

To find out the length of the strips, measure the circumference of the cone and multiply by two or three.
4. These are the “ruffles” you should get.


6. Then glue them to the cone, starting from the base. At the same time, step back a little from the base.


7. Glue all the “skirts” all the way to the top of the head, slightly retreating from the previous edge.

8. Then glue on decorations in the form of sequins or sparkles.

Making three-dimensional paper Christmas trees at home
The most in a simple way making souvenirs and home interior decorations is considered to be work made from ordinary paper. It is better, of course, to take high-quality and thick paper.
So, here are your options for creating paper Christmas trees.
Cut out two blanks according to the template. Cut one tree exactly along the middle from the bottom, and the other - from the top to the middle. Then insert both halves into the slots.


Make patterned trees in the same way. Only here you will need a special stencil.


And here is the template itself, for example.

By folding and gluing paper according to the pattern, a super voluminous craft is obtained. It is most convenient to connect the workpieces with a wire. Attach any decoration on top.


You can even simplify the manufacturing process. And connect simple circles. Look how colorful this product looks.

I also found an option to make it from regular strips. In my opinion, it also makes a worthy souvenir.

Well, or you can create these little accordion Christmas trees.

Also, don’t forget about the quilling technique.

DIY Christmas tree for New Year 2019 from plastic bottles
You know, I would never have thought that the forest beauty is made from plastic bottles. It turns out that the options from this material at hand are very diverse and exceeded all my expectations. Don't believe me? Then admire it for yourself! Watch the video, I'm sure it will interest you.
And for work, in addition to bottles, you will also need: acrylic paint and glitter. And the required dimensions of the branches are 8.5 cm x 6 cm; 7 cm x 6 cm; 6.5 cm x 6 cm; 6 cm x 6 cm; 5.5 cm x 6 cm; 5 cm x 6 cm; 4.5 cm x 5 cm; 4 cm x 5 cm; 3 cm x 3.
And on summer cottage or make a big craft like this in the yard together).

Here's a way to cut bottles and create fluffy branches. 

Or these miracles of cutting. How do you like this idea? I think it looks great!

Well, here are the works from solid bottles. If you want to make such creations, then start saving bottles now.


Or crumpled bottoms. And they just can’t come up with anything.

I hope I surprised you a little with these products.
Ideas for making Christmas trees from napkins and cotton pads
You can make cool crafts from ordinary white and colored napkins. And I will now show you how this can be done. The work is not difficult, but painstaking and long.

You will need: paper napkins different colors- 92 pcs. (the quantity depends on the size of the Christmas tree); pencil glue; stapler with small paper clips; thick paper for the cone; scissors; scotch.
Manufacturing process:
1. Fold the napkin in half, and then in half again. And fasten the middle of the resulting square with a paper clip.

2. Now cut out a circle from the blank.

3. Make a lot of these circles.


5. Do this with each layer.

6. As a result, you should get a bud.

7. Spread it out with your fingers.


8. You need to make a lot of these flowers.

9. Then cut out a sector of a circle from thick paper and roll it into a cone. Glue or secure the cone with tape, and secure it at the bottom with a stapler.

10. Glue the flowers onto the cone so that there are no gaps. Your flower napkin product is ready.
And one more option using the same technology.

Also, do not forget to decorate not only your home, but also festive table. And here are the variations of decorations.


Oh, I also found Father Frost and the Snow Maiden. This composition looks very cool.

And now I propose to build soft Christmas trees from cotton pads. They are usually folded and then also glued to the cone base. Next they decorate. The discs can also be painted with regular paint. Or just glue snow-white circles together.
Look at the photographs and see everything for yourself. The manufacturing technology is identical to those we have already discussed above, so I won’t go into detail.


The good thing about such crafts is that the material for their creation is always available at home. 🙂
Christmas tree made of threads. Master Class:
And now we will make a festive attribute from threads. The manufacturing technology is the same: glue threads are strung onto a cone and dried. Then they are removed and decorated. In general, let's look at everything in detail.

You will need: sheet of cardboard; a skein of green thread; PVA glue; scotch; beads; scissors.

Manufacturing process:
1. Take a sheet of cardboard and cover it with tape.

2. Then roll it into a bag to make a cone. Next, level the base.

3. Then, using scissors, make teeth that will hold the thread.

4. Dilute the glue in a small plate with water until it becomes liquid.

5. Take the threads and tie a knot at the end. Dip the thread into a bowl of glue; it should be thoroughly saturated. You can also lubricate the cone with glue.

6. Now wrap the thread around the cone in any order. At the same time, do not forget to dip the thread in glue.

7. Once you wrap the cone so that there are few gaps left, cut the thread and leave the workpiece to dry completely.

9. Now decorate the product with beads.
If you understand all the details, then everything is done quite easily and even a child can handle it.
Christmas tree craft for kindergarten and school competition
In addition to the fact that the forest beauty should decorate our home, it also educational institutions this attribute is assigned special meaning. And they always organize exhibitions of children's works. Therefore, I want to offer you products that your children can create.
You can also use the ideas described above and make Christmas trees with your children.
That's common paper work with a snowman made of cotton wool.

Or a creative idea with regular transparent bags. Class!

Options for inserted paper trees.

Work from tinsel, snow-white mesh fabric, as well as from a wire base and decorations.

Idea for kids. Make a cone, cover it with tape and stick a regular mosaic into it.

And here is the whole composition from last year's exhibition.

Video about how you can make a Christmas tree with your own hands
In fact, there are a lot of ways to make homemade Christmas trees. Only I offered you about 100 photo ideas. And what are they made of? I tried to sort out all the options as much as possible so that you can definitely choose your beauty and build it with pleasure. Finally, I picked up one story that contains different variants handmade Christmas trees. So to speak, for your inspiration).
Well, all I can do is wish you creative success and festive mood. And Happy New Year, friends!
MBOU "Kilinchinskaya Secondary School named after. Hero of Russia Azamat Tasimov"
“Summer, summer is red!”
Integrated Team work
/Open event for parents/
/first junior group/
Educational technologies: Health-saving/logorhythmics, music influence technology, finger gymnastics, gymnastics for the eyes/, integrated learning, game motivation, differentiated/individual approach.
Educator:
Yakupova Rasima Rafikovna
Astrakhan
S.Kilinci
2016
Target: introduce children to the signs of summer.
Tasks:
1. Expand children's knowledge about seasonal changes in nature.
2. Develop the ability to see beauty native nature in summer.
3. Develop the ability to recognize and name insects.
4. Develop speech, communication skills, auditory and visual attention.
5. Promote the development of cognitive activity.
6. Develop children’s ability to interact with each other, enrich their motor experience.
7. Cultivate perseverance.
8. Promote the active involvement of parents in joint creative activity with a child in a kindergarten.
Required material and equipment: bi-ba-bo doll (frog); easel; pictures: sun, grass, flowers, bumblebee, ladybug, butterfly; butterfly blanks, colored pencils; phonogram: "Sounds of nature. Frogs", "Sounds of nature. Bumblebee”, a song about summer “Summer is good”.
Preliminary work: blank butterfly silhouettes of different sizes for each child.
Progress of the event:
/Relaxation music “Sounds of Nature” plays/
Educator: We rise with the sun, we sing with the birds! WITH Good morning, happy clear day! We will smile at each other, hold hands together, the game begins, are you ready kids?
Children: /Yes!/
Educator: Hush, hush, don’t make noise, I hear strange sounds, who is in a hurry to visit us?
/The phonogram “Sounds of Nature” plays. Frogs"/
Children: /It's a frog!/
Frog: Kva-kva-kva, kva-kva-kva! I came to visit you, friends! Help, teach and tell us about summer!
Educator: Guys, let's tell the frog about summer, how we greet it, what does it give us?
Children: /Yes!/
Educator: Frog, frog, yellow belly, sit on a chair and listen carefully. We will tell you about summer, or better yet, we will show you summer!
Frog: How kind you are, friends, you didn’t drive me away. I will listen to you carefully, I will remember everything so that I can tell it to the frogs in the swamp!
Educator: Guys, I’ll tell you a riddle now! Don't rush, tell me the answer.Riddle: I will wake up early in the morning,I'll look and laugh,After all, at my windowShining brightly...
Children: /Sun!/
Educator: That's right, guys, you guessed the riddle. Summer is the sun, it shines in our window, it warms the earth, it gives us beauty!
/A flat sun appears on the easel/
Educator: Guys, let's say hello to the sun.
/Held finger game"Hello, sun" /
Hello, golden sun /fingers spread, palms on top of each other/
Hello, blue sky! /raise your arms up, palms open/
Hello, free breeze! /shaking hands/
Hello, small flower! /squat, palms clasped in front of you/
Hello morning! / right hand right/
Hello day! / left hand left/
Educator: Guys, what color is our sun?
Children: /Sun yellow color/
Educator: Guys, what shape is our sun?
Children: /The sun is round/
Educator: Well done! The sun is shining brightly, the grass is green and the flowers are growing, unprecedented beauty!
/Grass appears on the easel/
Educator: Guys, what color is the grass?
Children: /Green grass/
/Flowers appear on the easel/
Educator: Flowers grew in our clearing, they were multi-colored, like lights. What color are the flowers, please name them!
Children: /blue flower/ /Yellow flower/ /Red flower/
Educator: Now I’ll check how you know the colors.There are multi-colored flowers on the table in front of you, be careful, choose the flowers.
/A game is played for attention “Find a flower of the same color”/
Educator: Well done guys, you completed the task. We will continue the story about summer.
/The phonogram “Sounds of Nature” plays. Bumblebee"/
Educator: Who is this flying towards us?Who is that buzzing like that?
Children: /Bumblebee/
/A bumblebee appears on the easel/
Educator:
Above the flowerbumblebeeflies
And he collects nectar there.
Zhu-zhu-zhu, zhu-zhu-zhu!
I want to have lunch!
Educator: Guys, did you like the poem? What is it about?
Children: /About bumblebee/
Educator: How does a bumblebee talk?
Children: /
Zhu-zhu-zhu, zhu-zhu-zhu/
Educator:
Guys, let's recite a poem together!
/Children and the teacher recite the poem together/
Educator: The bumblebee invites us to fly. Look at the bumblebee with your eyes, you are watching the flight!
/Gymnastics for the eyes. Game exercise"Flight of the Bumblebee"/
Frog: Kva-kva-kva, kva-kva-kva! I'm kind of tired. I suggest you take a break! Quickly stand in a circle with me and repeat the movements after me.
/Logorhythmics of “Frogs”/
Educator: Guys, what other insects do you know?
Children: /Butterflies/ /Ladybug/ /Mosquito/
/Butterflies, a ladybug, a mosquito appear on the easel/
Educator: Bright bumblebees, ladybugs delight with its beauty. Only the butterflies are not bright today, they are very boring. In a moment, we will become artists, we will paint the butterflies right now!
/Children use cotton swabs and gouache paints to paint silhouettes of butterflies/
Educator: We frog told you about summer, we drew a picture of summer. Summer is sunshine green grass, colorful flowers,unprecedented beauty, butterflies fly and bumblebees buzz, they all just talk about summer.
Frog: Kva-kva-kva, kva-kva-kva! Thank you guys! I’ll hurry to the swamp and tell the frogs about summer. Goodbye friends!
/A song about summer “Summer is good” sounds/
Children simply adore summer, because it is the brightest and most fun time of the year. It always gives warmth, joy and abundance positive emotions. At this time, the sun shines brightly and warms, the day is long, you can wear light clothes and walk all day. This is the time of vacation and holidays, when you have the opportunity to spend time with your beloved family. In summer there are a lot of berries and fruits, vegetables and herbs. And most importantly, in the summer you can find a lot of exciting things to do!
Observations of nature in summer
You can tell children about summer endlessly. It's so beautiful!
Summer is the next time of year after. Everyone is looking forward to it. In summer, everything around is transformed: the sun is shining brightly, the grass is turning green around, flowers are blooming. The air is very warm, different aromas can be heard everywhere.
How the weather changes
The air temperature rises and it becomes hot. Thanks to this, the earth and water in rivers, lakes, ponds and seas heat up. You can safely sunbathe and swim.
Often in summer it's warm rain accompanied by thunderstorm. A thunderstorm occurs because the raindrops that make up thundercloud, are charged with electricity, and when a large charge breaks through between two such clouds, lightning occurs, followed by peals of thunder.
But then the thunderstorm passes, the clouds dissipate and the sun very quickly takes its place again. Towards the end of summer it becomes cooler, especially at night, and we are heading towards autumn.
How animals, birds and insects live
Animals are most active in summer. There is a lot of food around, many important things to do, including raising offspring and creating reserves for cold autumn and winter.
At this time, the chicks begin to learn to fly, leave their nests, they grow actively, eat a lot and prepare for independent life. The birds are chirping with might and main.
Insects are also busy with their summer business. Bees pollinate flowers, dragonflies fly over the surface of the water, butterflies flutter in the meadow. Domestic animals graze on green pastures dotted with tasty, soft and juicy grass.

Plants in summer
In summer, all the trees put on their summer suit of bright green leaves, the grass also turns green, actively grows and reaches out to the warm sun. Abundance sunlight promotes the formation of new buds, which will manifest themselves next year.
A beautiful colorful carpet of a variety of flowers was spread in the meadow. Fruits are ripening in the garden, vegetables and herbs are ripening in the garden, and berries are also ripening. In the forest by the end of summer you can collect mushrooms and nuts.

Features of human activity in summer
A lot of things await a person in the summer. It's a hot time to work in fields, meadows and dachas. To grow good harvest, you need to take proper care of it. There is weeding, pest control, watering and fertilizing of all plants. The soil is often loosened.
If the summer is dry, irrigation canals or watering installations are organized. The preparation of feed for livestock and firewood for the stove for the winter is also actively underway. Men are in the fields mowing hay, and women are engaged in harvesting and running the kitchen, preparing jam, compotes, and pickles.
Sports and active recreation in summer
Summer is a great opportunity to play sports with pleasure! This time of year gives limitless possibilities to strengthen your body with physical exercise. For children, this is absolutely paradise! After all, you can run and jump almost all day long! There are plenty of options to suit every taste:
- swimming in local reservoirs, the water in which has already been warmed by the summer sun;
- cycling, roller skating and scootering;
- movable;
- football;
- volleyball;
- basketball;
- tennis;
- badminton;
- jogging;
- charging on fresh air and much more.
Don't forget about the right equipment, safety and good mood!
And it’s so great to host in the summer! This wonderful holiday for the whole family!

Summer in fairy tales
Summer is a time no less fabulous than winter. Summer is busy incredible events and miracles! That's why tales about summer are so popular and loved by kids. They help develop your horizons, learn more about summer and have fun reading.
The most famous summer fairy tales include the work of D. Mamin-Sibiryak from “The Tale of How the Last Fly Lived.”
We also recommend that you take a closer look at “. wonderful summer tales G. Skrebitsky has “” and “”. An instructive and touching fairy tale was written by Valentin Kataev, it is called “”. A wonderful Soviet cartoon was filmed based on this fairy tale:
The greatest classic L.N. was also partial to fairy tales. Tolstoy. We advise you to read his tales about summer, “The Quail and Her Children.” We recommend that “” fans read E. Uspensky.
For those who like something unusual, it’s worth reading “or “The Ant Ship.”
A lot of fairy tales have been written all over the world about the fabulous summer. One such example is the famous Slovak folk tale"", as well as the Scottish folk tale "Moreg and the Water Horse" and the Estonian "Tales of One Summer" by Eno Raud.

Stories about summer
Options summer stories just mass. After all, summer is such a bright annual event that always gives incredible bright emotions and moments that everyone will later remember with warmth. To get even more into the spirit of summer, its riot of colors and aromas, and learn even more about summer, read children's literature with your child about this incredible time of year. The most interesting and memorable works:
- I. S. Sokolov-Mikitov “”, “Spiders”, “Chipmunk”, “”;
- L.N. Tolstoy “What dew happens on the grass”, “About ants”, “How wolves teach their children”;
- , "Birds talking at the end of summer", " ", " ";
- “Field strawberries” and “milk mushrooms”;
- “First Cancer”, “Dissatisfied Frog”, “Aspen Down”, “Red Cones”, “Anthill Stump”. "Sunset of the Year", " Dark forest", "Overgrown meadow", "Rye is pouring", "Spruce and birch", "Woodpecker". “Forest Dwellings”, “At the Old Stump”;
- "Golden Tench", " Summer days", "Collection of Miracles", " dense bear", "Poetry of Rain";
- “Knock-knock-knock”, “Cucumbers” and “Gardeners”.
Summer in painting
Every summer is unique and special. These bright colors, lush greenery, an abundance of flowers - you really want to leave all this to capture so that others can enjoy this beauty. Creating in the summer is an unreal pleasure! Look at the summer paintings of the renowned Russian landscape painter Dmitry Levin!

His works are so sensual and sweet to the heart, because they have absorbed all those moments for which we love summer so much!

These are simple joys that make us absolutely happy!

Russian artists convey that summer atmosphere very believably and deliciously. Look how realistic the birch trees are in I. Levitan’s painting “ Birch Grove»,

and how plausibly conveyed a summer day in the village by A.A. Plastov in the film “In Summer”.

I couldn’t help but paint another picture with birches famous artist A.I. Kuindzhi. His work “Birch Grove” is very light and calming; he shows how the summer sun warms the earth, plays with the leaves of birch trees, and transforms the entire space around.

I. I. Shishkin prefers to depict on his canvases Pine forest in summer. This is confirmed by his famous works"Pines illuminated by the sun"
